- How Android Private DNS protects DNS lookups
- How to configure NextDNS from Android Settings or with ADB
- How to verify the result, troubleshoot failures, and safely undo the change
Most of us open an app or type a website address without thinking about what happens next. Before your device can connect, it must ask a Domain Name System (DNS) service where that website or online service can be found.
Those DNS requests can reveal the services your device is trying to reach. Private DNS protects the request between your Android device and a compatible DNS provider by encrypting it. In this tutorial, we’ll use NextDNS as the provider.
This guide is not limited to the NVIDIA Shield. It covers:
- Android phones and tablets
- Android TV streaming devices and televisions
- Google TV streaming devices and televisions
- NVIDIA Shield TV
- Other Android-based devices that support Private DNS and Android Debug Bridge (ADB)
We’ll begin with the easy on-screen method. If your device hides the Private DNS menu—as many TV devices do—we’ll use ADB from a computer instead. No command-line experience is required; every command is explained.
What Are DNS and Private DNS?
DNS works like a directory for the internet. People remember a name such as techlittlebrawta.com, but computers connect using numerical IP addresses. Your device asks a DNS resolver to translate the name into the address it needs.
Traditional DNS requests are often sent without encryption. Private DNS on Android uses DNS-over-TLS, commonly shortened to DoT, to create an encrypted connection to a compatible DNS resolver.
Private DNS can:
- Protect DNS requests from casual observation while they travel across the network
- Apply the security, privacy, allowlist, denylist, and parental-control rules in your NextDNS configuration
- Give you one DNS policy that follows a portable device between compatible networks
Private DNS does not make you anonymous, replace a VPN, encrypt every part of your internet traffic, or guarantee that every app will use the system DNS service. An app with its own DNS resolver, or a VPN with its own DNS configuration, may bypass the Android setting.
Will This Work on My Device?
This guide is intended for devices that run Android, Android TV, or Google TV and support Android’s Private DNS feature. Private DNS was introduced with Android 9, but availability still depends on the device software and manufacturer.
Examples can include an NVIDIA Shield TV, Google TV Streamer, Chromecast with Google TV, onn. Google TV device, Xiaomi TV Box, and televisions from manufacturers that use Android TV or Google TV. Support still depends on the Android version and changes made by the manufacturer.
This procedure is not intended for Roku, Apple TV, Samsung Tizen, LG webOS, or another non-Android television platform. Amazon Fire TV is based on Android, but Fire OS differs enough that the exact menus and behavior in this guide are not guaranteed.
If your device shows a Private DNS option, use Method 1. If it runs Android TV or Google TV but hides that option, try Method 2.
What You’ll Need
For either method:
- An Android, Android TV, or Google TV device
- A working internet connection
- A NextDNS account and configuration
For the ADB method:
- A Windows, macOS, or Linux computer
- The computer and Android device connected to the same trusted home network
- The latest Android SDK Platform-Tools, which includes ADB
- Access to Developer options on the Android device
Important: Use wireless or network debugging only on a network you trust. Turn debugging off when the setup is complete.
Step 1: Create or Select a NextDNS Configuration
If you are new to NextDNS:
- Visit NextDNS and create an account.
- Sign in to the NextDNS dashboard.
- Create a configuration, or open the default configuration created for you.
- Review the Security, Privacy, Parental Control, Allowlist, and Denylist sections.
- Open the Setup tab.
The Setup page provides a configuration-specific Private DNS hostname. It looks similar to this:
abc123.dns.nextdns.ioIn that example, abc123 represents the NextDNS configuration ID. Your ID will be different.
Throughout this guide, we’ll use this placeholder:
YOUR_CONFIG_ID.dns.nextdns.ioReplace YOUR_CONFIG_ID with the ID shown in your NextDNS account. Do not type the words YOUR_CONFIG_ID.
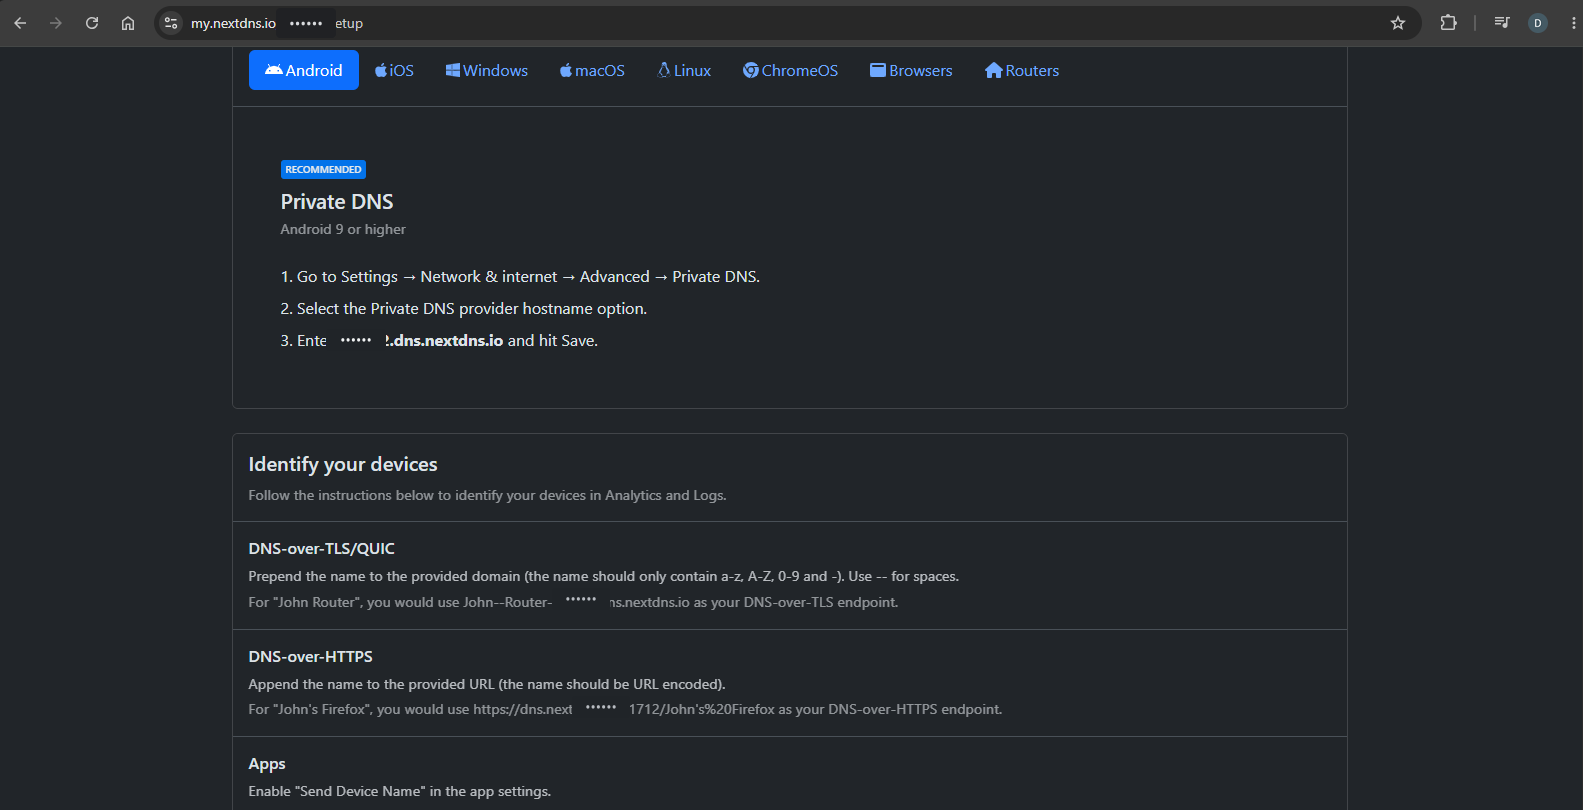
Actual NextDNS Setup page. The account’s configuration ID has been replaced with YOUR_ID for privacy.
Optional: Give the Device a Name in NextDNS
You can add a device name before the configuration ID so that requests are easier to recognize in the NextDNS logs.
For a device named “Living Room TV,” the hostname would look like this:
Living--Room--TV-YOUR_CONFIG_ID.dns.nextdns.ioUse:
- A single hyphen between the device name and configuration ID
- Two hyphens where you want a space in the displayed device name
- Only letters, numbers, and hyphens in the device-name portion
Copy the exact DNS-over-TLS hostname from your NextDNS Setup page when possible.
Common mistake: Do not enter
https://,tls://, a slash, or a web page address. Android needs only the hostname, such asabc123.dns.nextdns.io.
Method 1: Use the Private DNS Menu
Use this method if your phone, tablet, or TV displays a Private DNS option.
Menu names vary slightly by Android version and manufacturer, but the usual path is:
Settings → Network & internet → Private DNS
On some devices, you may first need to select Advanced, More connection settings, or Other network settings.
Then:
- Select Private DNS provider hostname.
- Enter your NextDNS hostname:
YOUR_CONFIG_ID.dns.nextdns.io- Select Save.
- Continue to the verification section later in this guide.
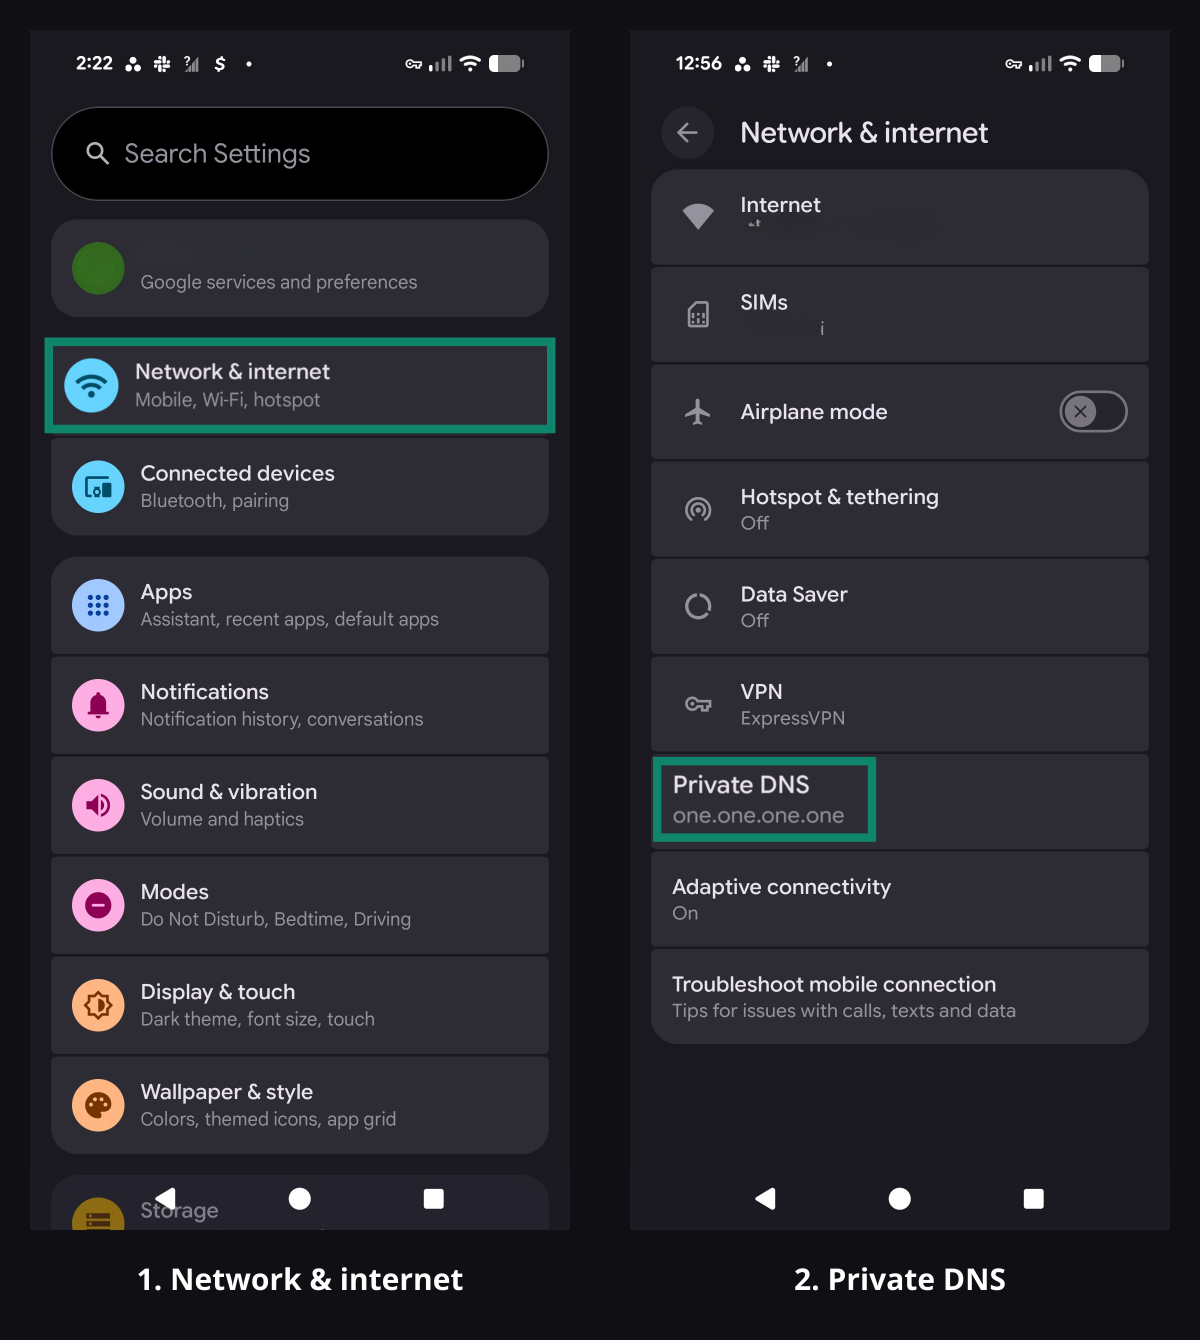
Actual Pixel-style Android Settings screens. First open Network & internet, and then select Private DNS. Screenshot source: ExpressVPN.
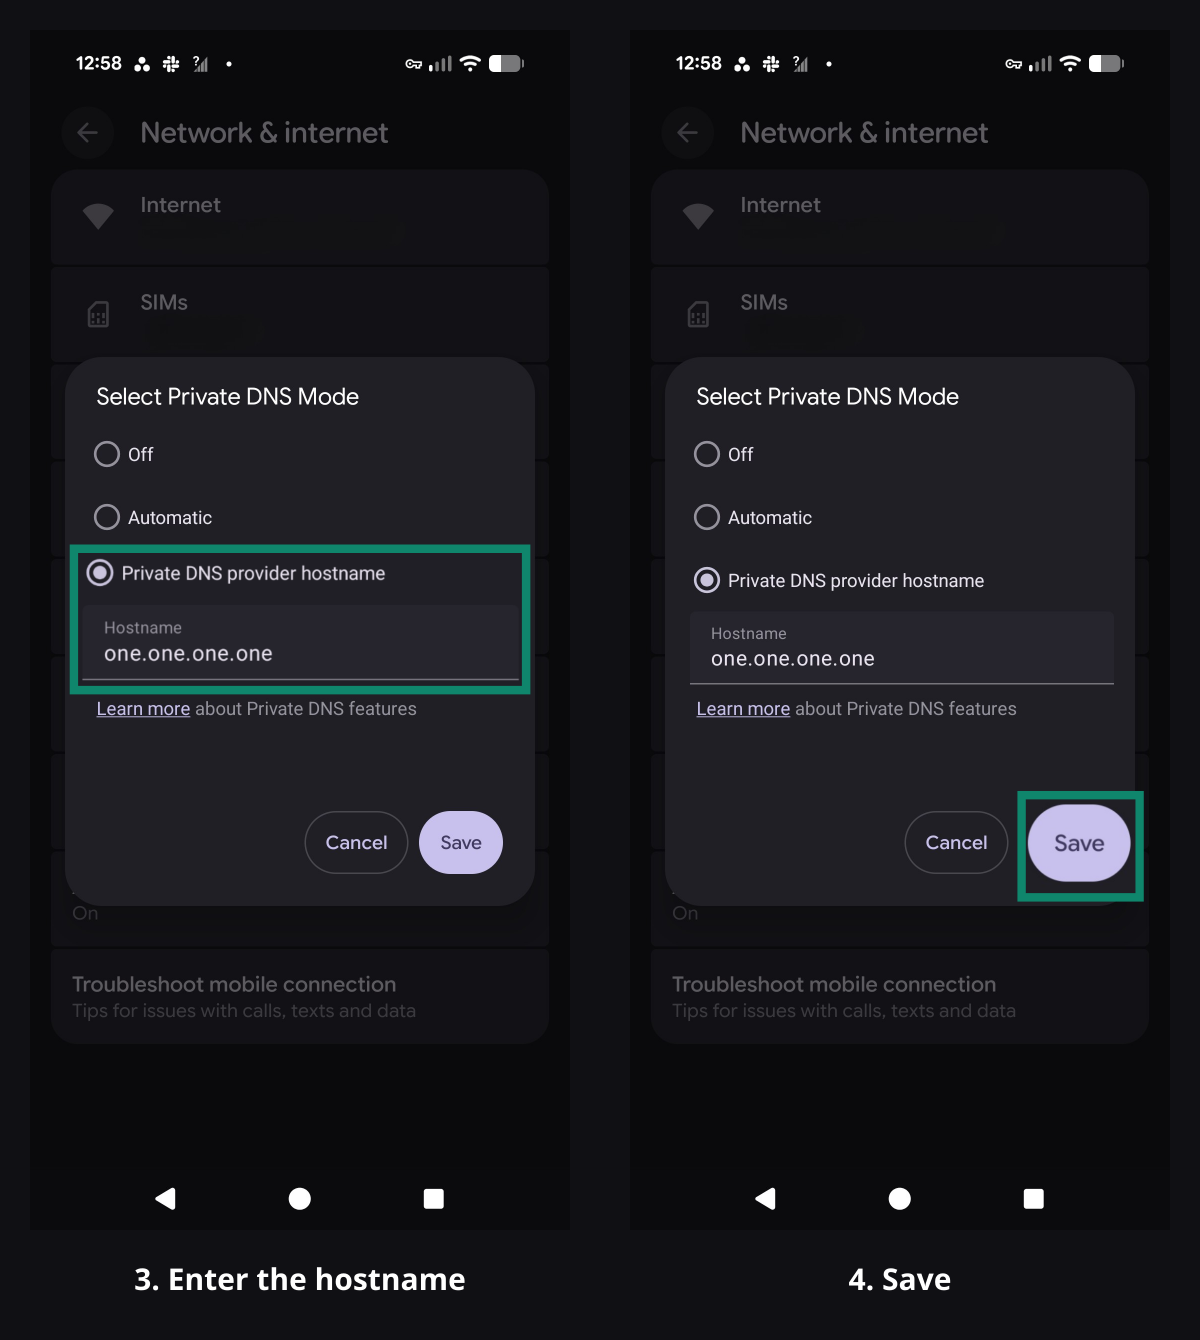
Actual Android Private DNS dialog. These reference screenshots contain Cloudflare’s one.one.one.one; when following this tutorial, enter your NextDNS hostname instead. Screenshot source: ExpressVPN.
If your Android TV or Google TV device does not show a Private DNS menu, that does not necessarily mean the feature is missing. The manufacturer may simply have hidden the menu. Method 2 changes the same Android setting through ADB.
Method 2: Use ADB When the Private DNS Menu Is Hidden
ADB stands for Android Debug Bridge. It is an official Android command-line tool that lets an authorized computer send commands to an Android device.
We will use it to save two settings:
- The NextDNS provider hostname
- The instruction to use a specific Private DNS hostname
We are not rooting the device, unlocking its bootloader, or installing custom firmware.
Step 2: Enable Developer Options
Developer options are hidden by default. The exact path varies, but these are the most common routes.
Google TV
- Open Settings.
- Select System.
- Select About.
- Find Android TV OS build.
- Select it seven times.
Android TV
- Open Settings.
- Select Device Preferences.
- Select About.
- Find Build.
- Select it seven times.
NVIDIA Shield TV
- Open Settings.
- Select Device Preferences → About. On some Shield versions, About appears directly in Settings.
- Find Build.
- Select it seven times.
NVIDIA documents the seven-click Build process in its official Shield ADB instructions.
You may be asked for the device PIN. When successful, the screen will display a message similar to “You are now a developer.”
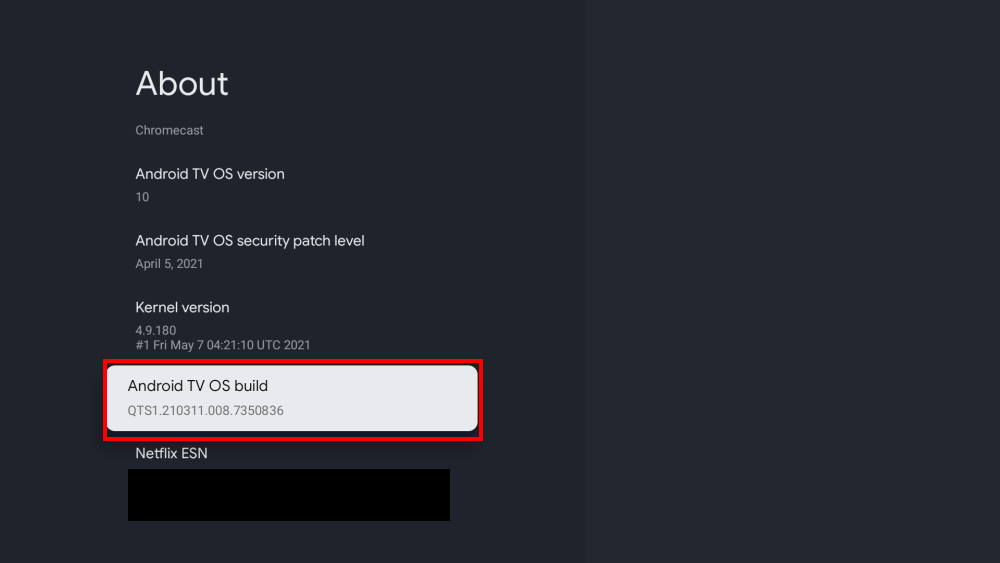
Actual Chromecast with Google TV About screen. Select Android TV OS build seven times. Newer software may show a different build number while keeping the same option. Screenshot source: All About Chromecast.
Step 3: Enable Debugging
Return to Settings and open Developer options. Depending on the device, look for one of these:
- Wireless debugging
- Network debugging
- ADB debugging
- USB debugging
The connection process depends on which option the device provides.
Option A: Wireless Debugging with a Pairing Code
Devices running Android 11 or later may have a Wireless debugging menu with Pair device with pairing code.
- Turn on Wireless debugging.
- Allow debugging on your current trusted network.
- Select Pair device with pairing code.
- Keep the screen open. It should display:
- An IP address
- A pairing port
- A six-digit pairing code
The pairing address may look like this:
192.168.1.50:37123The port is the number after the colon. It may change, so use the exact value shown on your device.
Option B: Network Debugging Without a Pairing Code
Some Android TV devices, including Shield software versions that expose Network debugging, use a direct ADB connection.
- Turn on Network debugging.
- Note the IP address and port shown on the screen.
It may look like this:
192.168.1.50:5555If the screen shows only an IP address, port 5555 is commonly used for this older connection method.
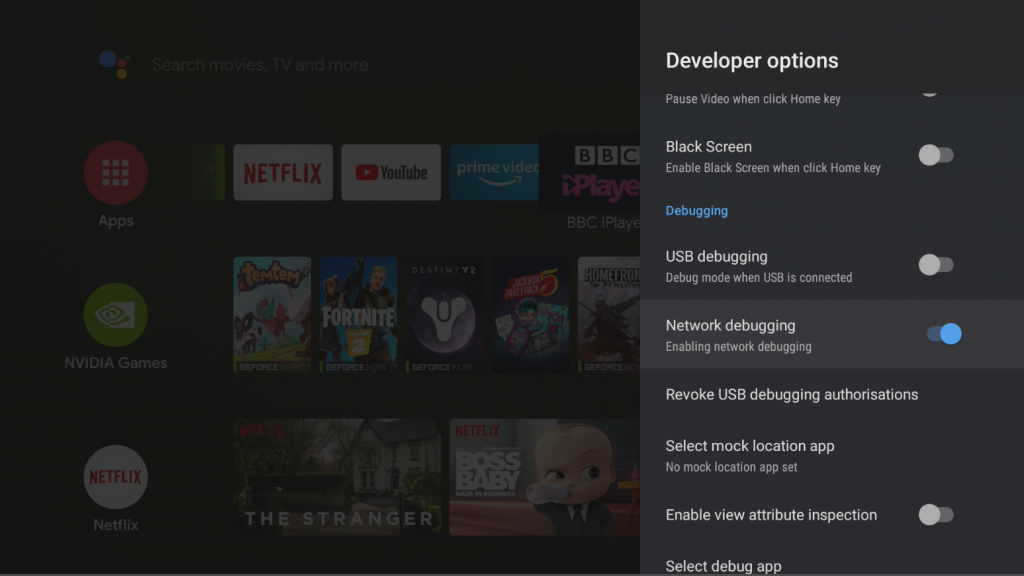
Actual NVIDIA Shield Developer options screen with Network debugging enabled. Screenshot source: BlackBox QA.
Step 4: Install ADB on the Computer
Google includes ADB in Android SDK Platform-Tools. You do not need to install the full Android Studio application.
- Open the official SDK Platform-Tools download page.
- Download the package for Windows, macOS, or Linux.
- Extract the downloaded ZIP file.
- Open the extracted
platform-toolsfolder.
Open a Terminal in the Correct Folder
Windows 11:
- Right-click an empty area inside the
platform-toolsfolder. - Select Open in Terminal.
macOS or Linux:
- Open Terminal.
- Type
cd, add a space, and drag theplatform-toolsfolder into the Terminal window. - Press Enter.
Check that ADB works:
adb versionOn macOS or Linux, you may need to add ./ before each command:
./adb versionIf adb version displays version information, you’re ready. If Windows says that adb is not recognized, confirm that the Terminal is open inside the extracted platform-tools folder.
Step 5: Connect the Computer to the Android Device
Use the section that matches the debugging screen on your device.
Pairing-Code Method
With Pair device with pairing code still open, enter:
adb pair DEVICE_IP:PAIRING_PORTExample:
adb pair 192.168.1.50:37123ADB will ask for the six-digit pairing code displayed on the TV. Type it and press Enter.
After pairing, return to the main Wireless debugging screen. Find the device’s normal debugging IP address and port. This port may be different from the pairing port.
Connect with:
adb connect DEVICE_IP:DEBUGGING_PORTExample:
adb connect 192.168.1.50:39817Common mistake: The pairing port and debugging port are not always the same. Use the address shown on the pairing screen for
adb pair, then use the address shown on the main Wireless debugging screen foradb connect.
Direct Network-Debugging Method
Enter:
adb connect DEVICE_IP:PORTExample:
adb connect 192.168.1.50:5555The TV may display a message asking whether to allow debugging from your computer. Select Allow. On a personal computer, you may also select Always allow from this computer.
Confirm the Connection
Run:
adb devicesA successful connection looks similar to this:
List of devices attached
192.168.1.50:5555    device
The word device at the end means ADB is connected and authorized.
Do not continue if the status says unauthorized, offline, or if no device appears. Use the troubleshooting section below first.
Step 6: Save the NextDNS Private DNS Settings
We’ll enter two commands. Replace the example hostname with the exact one from your NextDNS Setup page.
First, save the provider hostname:
adb shell settings put global private_dns_specifier YOUR_CONFIG_ID.dns.nextdns.ioNext, tell Android to use a specific Private DNS provider:
adb shell settings put global private_dns_mode hostnameIf you created a device-identifying hostname, the first command may look like this:
adb shell settings put global private_dns_specifier Living--Room--TV-YOUR_CONFIG_ID.dns.nextdns.ioNothing dramatic may appear after each command. A blank response normally means Android accepted it.
What Did Those Commands Do?
The first command saved the NextDNS hostname in Android’s global private_dns_specifier setting.
The second changed private_dns_mode to hostname, which tells Android to use the specific provider hostname instead of Automatic or Off mode.
Step 7: Confirm the Saved Values
Check the Private DNS mode:
adb shell settings get global private_dns_modeThe result should be:
hostnameCheck the provider hostname:
adb shell settings get global private_dns_specifierThe result should match the hostname from your NextDNS account:
YOUR_CONFIG_ID.dns.nextdns.ioIf either value is wrong, repeat the matching settings put command before restarting.
Step 8: Restart the Device
Restart from the device’s normal Settings menu, or use:
adb rebootThe ADB connection will close while the device restarts. That is expected.
Step 9: Verify That NextDNS Is Actually Being Used
Checking the saved values confirms that Android stored the configuration. We also want to confirm that DNS requests are reaching NextDNS.
Check from a Web Browser
If the device has a browser, visit:
The result should indicate that the device is using NextDNS. A configured connection should also report the correct NextDNS profile.
Check the NextDNS Logs
- Sign in to the NextDNS dashboard.
- Open the correct configuration.
- Select Logs.
- On the Android device, open a few streaming apps or load online content.
- Refresh the NextDNS log and look for recent requests.
If you used a device-identifying hostname, the name should help you recognize the device.
Test a Blocked Domain Carefully
If you have enabled a standard blocklist in NextDNS, the Setup page can help confirm that the correct configuration is active. Avoid adding a service you use to the Denylist merely for testing; an accidental block can make troubleshooting harder.
Step 10: Turn Off Debugging
Once Private DNS is working:
- Return to Settings → Developer options.
- Turn off Wireless debugging, Network debugging, or the debugging option you enabled.
- If the device provides a Paired devices list, remove computers you no longer want authorized.
The Private DNS settings will remain in place after debugging is turned off.
Troubleshooting
“adb” Is Not Recognized or the Command Is Not Found
- Confirm that you extracted the Platform-Tools ZIP file.
- Open the Terminal inside the extracted
platform-toolsfolder. - On macOS or Linux, try
./adbinstead ofadb. - Do not run the command from inside the ZIP file preview.
ADB Reports “Connection Refused”
- Confirm that debugging is still enabled.
- Make sure the computer and Android device are on the same local network.
- Enter the exact IP address and port currently shown on the device.
- Do not assume that a temporary wireless-debugging port will remain the same.
- Check whether guest Wi-Fi, access-point isolation, or client isolation is preventing local devices from communicating.
Restart the ADB service:
adb kill-server
adb start-server
Then try adb connect again.
ADB Reports “Unauthorized”
Look at the television or device screen for an authorization prompt and select Allow.
If no prompt appears:
- Disconnect with
adb disconnect. - Turn debugging off and back on.
- Select Revoke USB debugging authorizations if the option is available.
- Pair or connect again.
adb pair Works but adb connect Fails
Return to the main Wireless debugging screen and check the debugging address. The pairing screen may use a different port. Use:
adb connect DEVICE_IP:DEBUGGING_PORTnot the expired pairing address.
The Internet Stops Working After Private DNS Is Enabled
Android’s hostname mode is strict. If the hostname is incorrect or the network blocks DNS-over-TLS, DNS requests can fail.
Check for:
- A mistyped configuration ID
- An accidental
https://ortls://prefix - A space, slash, underscore, or other invalid character
- A router, firewall, or network that blocks DNS-over-TLS on TCP port 853
- A temporary NextDNS or internet connection problem
Use the rollback instructions below to restore Android’s Automatic behavior.
NextDNS Works, but Some Requests Are Missing
Some applications and VPN services use their own DNS resolver. Those requests may not appear in the NextDNS log because they never use Android’s system Private DNS setting.
Local Device Names Stop Resolving
A strict external Private DNS provider may not know the local hostnames created by your router, such as a printer or server name used only inside your home. Connect with an IP address, configure appropriate rewrites in NextDNS, or use a router-level DNS design if local name resolution is important.
The Settings Commands Return a Permission Error
Some manufacturers restrict changes to global settings or remove parts of Android’s Private DNS support. Update the device software, confirm that ADB is fully authorized, and check the manufacturer’s documentation. If the restriction is part of the firmware, a router-level NextDNS configuration may be the better option.
How to Undo the Change
To return Android to its normal Automatic Private DNS behavior, reconnect with ADB and run:
adb shell settings put global private_dns_mode opportunisticOptionally remove the saved provider hostname:
adb shell settings delete global private_dns_specifierRestart the device:
adb rebootOn a phone, tablet, or device with the Private DNS menu, you can simply change the setting to Automatic instead.
A Few Important Security and Privacy Notes
- Private DNS encrypts DNS lookups; it does not hide your IP address from websites or streaming services.
- NextDNS can log DNS activity if logging is enabled in your account. Review the Settings and Privacy options and choose a retention policy that fits your needs.
- A VPN may replace or bypass the system DNS configuration.
- A device manufacturer or app can change behavior after a software update, so verify the connection again after a major update.
- Disable ADB debugging when you finish. There is no reason to leave it available during normal streaming.
Conclusion
There you have it! Whether the Private DNS option is visible in Settings or hidden by an Android TV interface, the goal is the same: save your configuration-specific NextDNS hostname and verify that the device is actually using it.
For a phone or tablet, the on-screen menu is usually all you need. For an NVIDIA Shield, Google TV device, Android TV box, or compatible television that hides the setting, ADB gives us a practical way to reach the same Android feature without rooting the device.
Take your time, copy the exact hostname from NextDNS, verify the result, and turn debugging off when you’re finished. That little extra check is what turns a copied command into a secure, dependable setup.