When you build a lab in PNETLab, the devices inside the topology do not automatically know how to reach your real home network or the internet. They live inside the lab until you connect them to something outside the lab.
That is where Management(Cloud0) comes in.
Management Cloud0 is the PNETLab network object that connects a lab device to the same outside management network that your PNETLab server uses. Once a router, firewall, switch, Linux server, or other lab node is connected to that cloud network and given proper IP settings, it can reach your LAN and, if your LAN has internet access, the internet.
This guide starts from the beginning. You do not need to already know what Cloud0 is, what a management network is, or why your lab device cannot ping the internet yet.
What You Will Build
By the end, you will have a PNETLab network object using Management(Cloud0). In the screenshots, the example name is HOME-NETWORK, but you can use any clear name. You will connect a lab device to that network, give the device an IP address, and verify that it can reach the internet.
This is useful when you want a lab node to:
- Download packages or updates
- Reach GitHub, vendor repositories, or public documentation
- Test DNS, routing, VPN, firewall, proxy, or automation workflows
- Let automation tools such as Ansible reach lab devices over your real network
What Management Cloud0 Actually Does
Think of a normal PNETLab topology as a private workbench. Devices can talk to each other inside the lab, but they are not automatically plugged into your real network.
Management(Cloud0) acts like a cable from the lab into the outside management network. In many home labs, that outside network is the same network where your laptop, router, and PNETLab server already live.
For example:
- Your home router might be
192.168.1.1 - Your PNETLab server might be
192.168.1.252 - A lab node connected to Cloud0 might receive
192.168.1.240
If the lab node has the right IP address, gateway, and DNS server, it can reach the internet through your home router.
Important: Cloud0 can expose lab devices to your real LAN. Only connect images and devices you trust, especially if the lab includes firewalls, malware analysis, unknown appliances, or vendor images you have not hardened.
What You Need
Before starting, make sure you have:
- A working PNETLab server
- Access to a lab topology in PNETLab
- At least one lab node to connect
- A PNETLab server management interface that can already reach your LAN or the internet
- Either DHCP on your home network or a static IP address you can safely assign
If your network does not use 192.168.1.0/24, that is fine. Use your own LAN subnet, gateway, and DNS settings.
Step 1: Open the Add Object Menu
Open your PNETLab lab topology. On the blank topology canvas, open the object menu and choose Network.
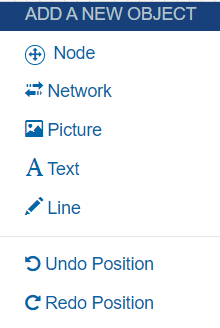
Use Network, not Node. A node is a router, switch, firewall, or server. The internet connection point is a network object.
Step 2: Add a Management Cloud0 Network
In the ADD A NEW NETWORK window, use these values:
- Number of networks to add:
1 - Name/Prefix: use a clear name such as
HOME-NETWORK,INTERNET, orLAB-INTERNET - Type:
Management(Cloud0) - Icon: leave the default cloud icon
Then select Save.
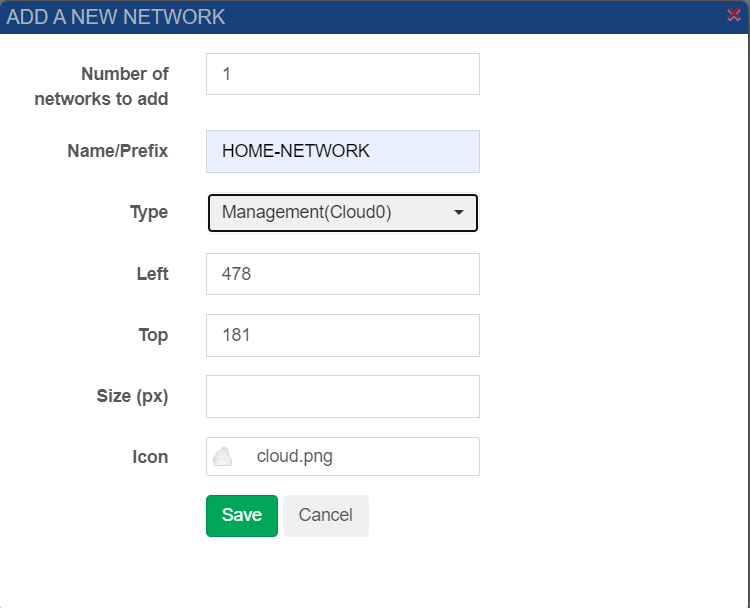
The name does not have to be HOME-NETWORK, but a clear name helps later. Avoid vague names like net1 when the object is connected to your real LAN.
Step 3: Confirm the Cloud Network Appears
After saving, PNETLab places the cloud object on the topology. You should see a cloud icon with the name you entered. In the example screenshot, it is labeled HOME-NETWORK.
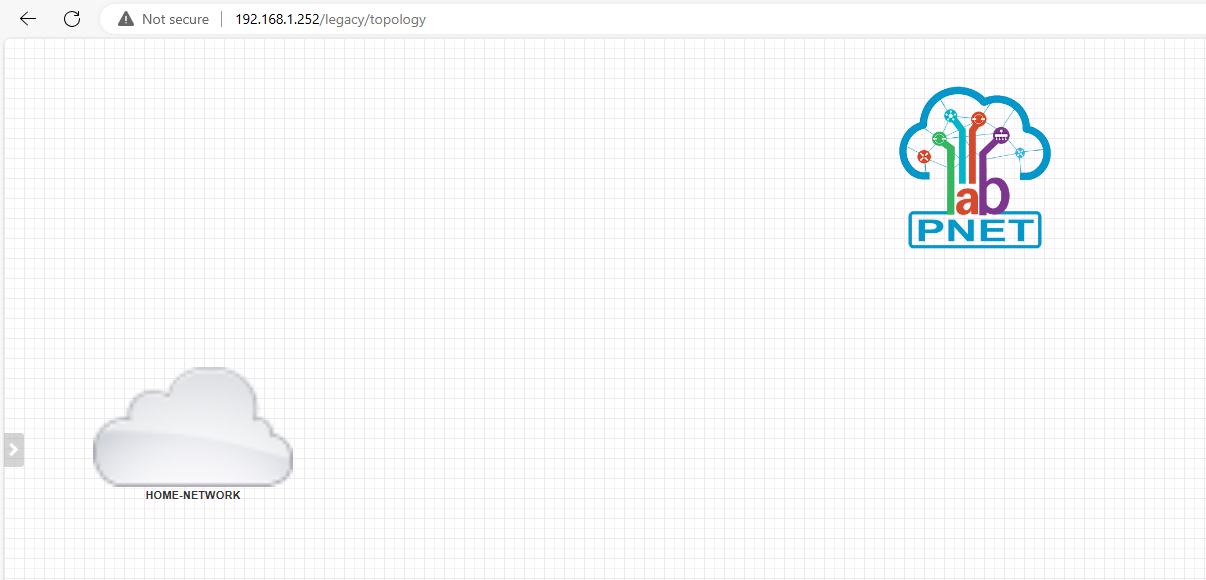
At this point, the cloud exists, but no lab device is using it yet.
Step 4: Connect a Lab Device to the Cloud0 Network
Add or select the device that needs internet access. Then connect one of its interfaces to the Cloud0 network you created.
Use a management interface when the image has one. On many lab images, that may be the first interface, such as:
eth0ens3GigabitEthernet0/0Ethernet0/0Management0
The exact name depends on the operating system or network image you are running.
If the device already uses one interface for the lab topology, do not reuse that same interface for Cloud0 unless that is what you intend. A clean design is to reserve one interface for management or internet access, then use other interfaces for the lab itself.
Step 5: Give the Device an IP Address
Connecting the cable is only half the job. The device still needs working IP settings.
Option A: Use DHCP
If your home router or DHCP server gives out addresses, DHCP is the easiest option.
On an Ubuntu or Debian-style Linux node, first find the interface name:
ip linkThen request an address. Replace eth0 with the interface connected to your Cloud0 network:
sudo dhclient eth0Check the result:
ip address show eth0
ip route
On a Cisco IOS-style device, DHCP may look like this:
enable
configure terminal
interface Ethernet0/0
 ip address dhcp
 no shutdown
end
show ip interface brief
show ip route
Your interface name may be different. Use the interface that you connected to your Cloud0 network.
Option B: Use a Static IP Address
Use a static address if DHCP is not available or if you want the lab device to keep the same address.
Before choosing an address, check your LAN range and avoid using an IP that already belongs to another device.
Example static settings:
- IP address:
192.168.1.240 - Subnet mask:
255.255.255.0 - Default gateway:
192.168.1.1 - DNS server:
1.1.1.1or your router IP
On a Cisco IOS-style device, that might look like this:
enable
configure terminal
interface Ethernet0/0
 ip address 192.168.1.240 255.255.255.0
 no shutdown
exit
ip route 0.0.0.0 0.0.0.0 192.168.1.1
ip name-server 1.1.1.1
end
write memory
Use addresses that match your network. Do not copy 192.168.1.240 unless your LAN is actually 192.168.1.0/24 and that address is unused.
Step 6: Test Internet Access
Test in layers. This makes troubleshooting much easier.
First, confirm the interface has an IP address:
ip addressOn a Cisco IOS-style device:
show ip interface briefNext, test the default gateway:
ping 192.168.1.1Replace 192.168.1.1 with your real gateway.
Then test a public IP address:
ping 1.1.1.1Finally, test DNS:
ping techlittlebrawta.comIf the public IP works but the domain name does not, your routing is probably fine and DNS is the problem.
Common Problems and Fixes
The Device Does Not Get a DHCP Address
Check these first:
- The device interface is connected to your Cloud0 network
- The cloud network object uses
Management(Cloud0), not another network type - The interface inside the device is enabled
- Your real LAN has a working DHCP server
- The PNETLab server itself has working network access
If DHCP still fails, try a static IP address on the same subnet as your PNETLab management network.
The Device Gets an IP Address but Cannot Reach the Internet
Check the default route. The device needs a route that points to your LAN gateway.
On Linux:
ip routeOn Cisco IOS:
show ip routeIf there is no default route, add one. If there is a default route but it points to the wrong next hop, correct it.
The Device Can Ping an IP Address but Not a Website Name
That is usually DNS.
On Linux, check:
resolvectl status
cat /etc/resolv.conf
On Cisco IOS, add or correct the DNS server:
configure terminal
ip name-server 1.1.1.1
end
Your Lab Uses the Same Subnet as Your Home Network
Avoid overlapping subnets. If your home network is 192.168.1.0/24, do not also use 192.168.1.0/24 inside the lab for unrelated internal links. Overlap can make routes confusing and break traffic in ways that look random.
Use different lab ranges such as:
10.10.10.0/2410.20.20.0/24172.16.100.0/24
Security Notes
Cloud0 is convenient, but treat it with respect.
- Do not connect untrusted or unknown images directly to your home LAN
- Do not give every lab device internet access just because it is easy
- Use a firewall or isolated VLAN if you are testing risky systems
- Remove the Cloud0 connection when the lab no longer needs outside access
- Keep management credentials off lab devices unless required
For a serious home lab, the cleanest design is a dedicated lab VLAN with controlled internet access. Cloud0 still works, but your router or firewall gets to decide what the lab is allowed to reach.
Limitations
This guide focuses on the PNETLab Management(Cloud0) method shown in the supplied screenshots. Your exact result still depends on how the PNETLab virtual machine is connected to the hypervisor, how your LAN handles DHCP, and how the device image names its interfaces.
Also remember that Cloud0 is not the same thing as a fully designed lab edge firewall. It is a fast way to connect a node to the outside management network. If you need controlled internet access for many lab devices, use a dedicated lab VLAN, firewall rules, or a NAT design that matches your environment.
Rollback: Remove Internet Access
To undo the change:
- Shut down the lab device if needed.
- Delete the link between the device and the Cloud0 network.
- Delete the Cloud0 network object if nothing else uses it.
- Remove the IP address, default route, or DHCP configuration from the device.
- Start the device again and confirm it only has the lab connections you intended.
On a Cisco IOS-style device using the earlier static example:
enable
configure terminal
interface Ethernet0/0
 no ip address
 shutdown
exit
no ip route 0.0.0.0 0.0.0.0 192.168.1.1
end
write memory
Final Check
You are done when all three tests pass:
- The lab device has an IP address on your management or home network.
- The lab device can ping the default gateway.
- The lab device can resolve and reach a public domain name.
That gives you a practical, repeatable way to connect PNETLab devices to the internet without rebuilding the whole lab.
Sources
- PNETLab documentation
- External Connectivity - netlab documentation
- Screenshots supplied in the attached source document:
Connect devices to internet in PNETLab.docx